Folding step stool woodworking plan - Step by Step Guide

Looking for a practical woodworking project that combines usefulness, clever design, and classic craftsmanship? This folding step stool is a wonderful project for the home workshop. Originally designed as a compact step-ladder stool, it provides a comfortable working height for reaching upper shelves, washing woodwork, or working around the kitchen—and folds neatly away when not in use.

This design is built from three main sections: the front ladder with steps, rear supporting legs, and hinged top seat. With carefully angled side rails, sturdy steps, hinges, and adjustable struts, the finished stool opens into a stable step ladder and folds into a slim, easy-to-store form.

Folding step stool woodworking plan - Step by Step Guide

Excerpt from the book: "Carpentry & mechanics for boys: up-to-the-minute handicraft" by Hall, A. Neely (Albert Neely), Publication date 1918 / Publisher Boston: Lothrop, Lee & Shepard Co.

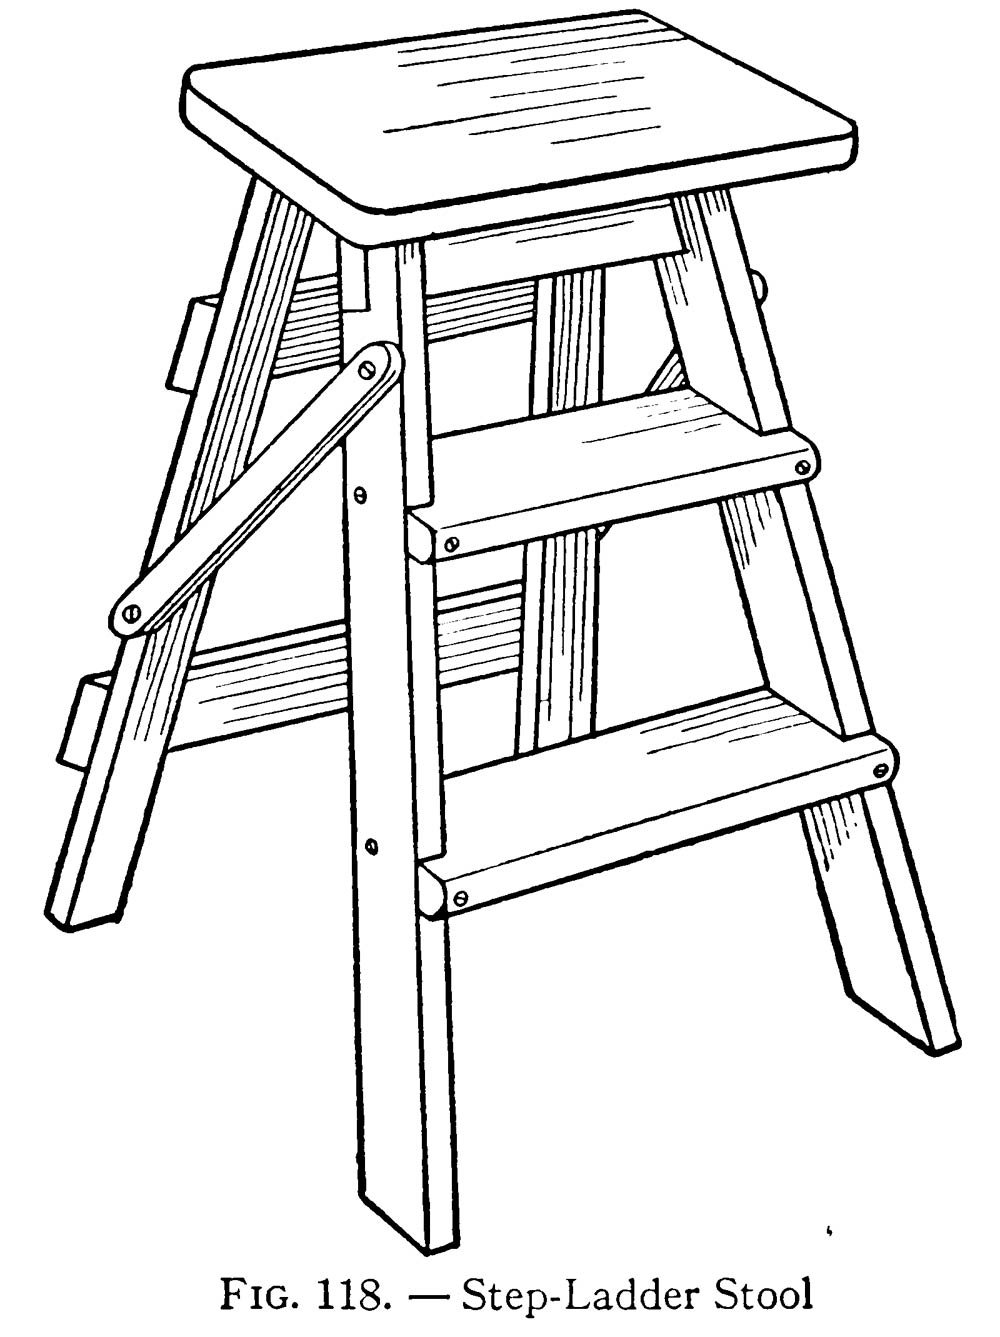
A Step-Ladder Stool is of just the right height for general household use, for washing woodwork, or for reaching upper shelves in the pantry. It also makes an excellent kitchen stool, the lower step serving the purpose of a foot-rest. When the ladder-stool is not in use, it may be folded into the compact form shown in Fig. 119, and stood behind a door or in some other out of the way place.

Folding step stool woodworking plan - How to make a step ladder stool

The Ladder consists of three portions, the steps (Fig. 120), the rear legs (Fig. 125), and the seat or top step (Fig. 128).

Folding step stool woodworking plan - How to make a step ladder stool - 2


The Side Rails of the steps (A, Fig. 120) should be cut of the dimensions shown in Fig. 121. Mark the ends to be cut to the angle shown, the top to be notched to receive an end of the crosspiece D (Fig. 120). The diagram shows the positions for steps B and C. The steps must pitch at the same angle as the rail ends. Groove the side pieces to a depth of 3/8 inch, to receive the ends of the steps (Fig. 123).

Folding step stool woodworking plan - How to make a step ladder stool - 3
You will see by Fig. 120 that the sides of the grooves must not be cut down at right angles, but at a pitch corresponding to that of the side rails, to accommodate steps B and C.

Figure 122 shows dimensions for cutting The Steps B and C. The ends of these pieces must be beveled slightly to make them correspond to the angle formed by side rails A.

In assembling the rails and steps, first set the ends of the steps in the grooves in the side rails, and drive screws through the projections on the ends of the steps into the front edges of the side rails, also drive screws through the side rails into the step ends. Cut crosspiece D of the width and thickness of the notch in the upper end of side rails A, and of about the length of step B; slip it into the notches, nail it to the edges of side rails A, and saw off the ends flush with the outside face of the rails.

Folding step stool woodworking plan - How to make a step ladder stool - 4
The Rear Legs (E, Fig. 125) must be spaced the same distance apart, and placed at the same angle, as the side rails A of the ladder. Cut the legs of the dimensions shown in Fig. 126, and the pair of cross-pieces F and G of the dimensions shown in Fig. 127. Use the steps as a guide for fastening together legs E and crosspieces F and G, so as to get them of equal width.

With the steps and rear legs assembled, prepare The Top Step or seat (H) by the pattern shown in Fig. 128. Then screw one flap of a pair of hinges (I) to the inner face of crosspiece D of the steps, the flap of another pair of hinges (J) to the outer face of rear legs E, and screw the other flaps to the underside of seat H in the positions shown in Fig. 124.

The Struts K prevent the legs from sliding farther apart when the ladder is opened to the position shown in Fig. 124. Cut this pair of strips of the size shown in Fig. 129, bore a screw-hole near each end, and screw the ends both to rails A and rear legs E, as shown in Fig. 118.

If the struts have been adjusted carefully, the step-ladder will fold into the form shown in Fig. 119, but not while weight is upon the steps. That is to say, the ladder will not fold up while you are standing or sitting upon it.

Excerpt from the book: "Carpentry & mechanics for boys: up-to-the-minute handicraft" by Hall, A. Neely (Albert Neely), Publication date 1918 / Publisher Boston: Lothrop, Lee & Shepard Co.

Growing an oak tree indoors - How to grow a miniature oak tree in a bottle

Have you not often admired the stately oak tree?
I will tell you, then, how you can grow a very interesting miniature oak in your window. In the autumn you can find beneath some oak multitudes of ripe acorns that have fallen amid the decaying leaves.
Select one that is large and well grown, and by means of a very stout needle run a strong thread through it so that the acorn will hang with the pointed end straight downward.

Excerpt from the book: "Our boys; what they can do and how to do it" by Stoddart, William, Publication date 1893 / Publisher New York, Hunt & Eaton; Cincinnati, Cranston & Curts

Growing an oak tree indoors - How to grow a miniature oak tree in a bottle


Take a short, wide-mouthed bottle and suspend the acorn in it, placing the two ends of the thread over the opposite sides of the neck and fastening them by wrapping a few turns of fine thread or string around the neck of the bottle and then knotting it securely.
Then pull upon the ends of the thread that runs through the acorn until it hangs fairly with the point downward in the center of the bottle. Now pour water in the bottle until it just touches the point of the acorn, but no more. Fig. 1 shows it. Cut a small piece of card, turn down the edges, and lay it over the mouth of the bottle. Now set the bottle and acorn in the window or on a bracket, and in a few days more or less, depending upon the warmth of the room, the shell will open at the point, and a long white root will grow downward into the water.
This root will go on elongating for weeks. In a state of nature this would become the tap root of the oak, but as it cannot escape from its glass prison it goes on coiling itself round and round the inner side of the glass until a foot or more is crowded in the bottle and small roots grow from its sides. In a short time the upper covering of the acorn will split and a little green stem will force its way out, bearing delicate little leaves of the brightest green.
The stem and leaves will grow with vigor, and an opening must be made in the card covering to allow the little oak to grow out in the open air.
Fig. 2 shows the tree.

Growing an oak tree indoors - How to grow a miniature oak tree in a bottle

This may all seem to be merely child's sport, but I assure you it will prove interesting for the older people as well.

What Is Crop Rotation And What Are The Benefits Of Crop Rotation

The land that we need for growing food is very important. We can't afford to spoil it. There are many ways in which farmers could make better use of the land and grow good crops without the help of factory-made chemicals.
If it is farmed with care, the land will go on giving us enough food to eat for thousands of years to come.
One method of careful farming is called crop rotation.
Different kinds of plants take different nutrients from the soil and leave others behind. The same crop planted year after year takes out the same nutrients.
But different crops, like corn and alfalfa, can be planted on the same piece of land.
One year, corn is planted. This will take out certain nutrients from the soil. The following year, alfalfa will be planted. The alfalfa will put back the nutrients absorbed by the corn.

How to Soften Hard Water?

Do you live in a place where the water is "hard"?  
It is easy to tell if you do, because a chalky layer, or scale, will usually build up inside your kettle.
This layer is often called lime or limescale.
Scientists call it calcium carbonate. 
It is left on the inside of the kettle when some types of hard water are boiled.
Water becomes hard when it soaks through chalk, limestone or dolomite rocks.
These are all relatively soft rocks, some of whose chemicals dissolve in the water.
When water is boiled, the dissolved substances change, leaving the solid calcium carbonate behind.

In many ways, hard water is a nuisance.
When you wash in hard water, it is difficult to work soap into a lather.
Instead, the soap makes an unpleasant layer of scum on the surface of the water.
Because hard water contains harmful minerals, it can also do harm to hot-water systems.
Unless special chemicals are added to the water, scale builds up in the hot-water tanks and pipes just as it does inside a kettle. In time, the hot-water pipes may become blocked.

How to soften hard water?

One simple way of making hard water softer is to add a small amount of washing soda.
The chemical name for washing soda is sodium carbonate.
It removes the minerals that make the water hard. This stops a film of scum from forming and allows lather to form in the water when soap is added.
One simple way of making hard water softer is to add a small amount of washing soda.
The chemical name for washing soda is sodium carbonate.
It removes the minerals that make the water hard.
This stops a film of scum from forming and allows lather to form in the water when soap is added.

How to test for hard water - Home test

Find out if you live in a hard or soft water area.
You will need:
a bowl of water soap
washing soda a spoon
1. Run some water into the bowl and wash your hands using soap.
Did it make plenty of lather quickly? 
If so, your water supply is soft.
2. If the soap left a film of scum on your hands instead of working into a lather, empty and rinse the bowl and refill it.
Add one spoonful of washing soda and stir with the spoon until it dissolves.
Now take the soap and wash your hands again.

What is Hot Water Heating?

Hot water or steam in pipes is a convenient way of moving heat around buildings. This is what some central heating systems do. The water is heated up in a boiler and pumped through pipes to radiators in each room. Heat travels from the water into the metal of the radiators. Moving heat from one object to another in this way is called conduction.
Now the heat travels from the radiators to warm the air in the room.
It does this in two ways.
One is by a movement called convection. The radiator heats the air around it. The heated air rises and cool air rushes in to take its place. The hot air moves along the ceiling away from the radiator pushing cooler air in front of it. This convection current moves down the wall opposite the radiator, along the floor and so back to the radiator again.
The other way a radiator works is by sending out waves of heat in the same way as the sun. This is called radiant heat.


Hot air from the radiator moves around the room. The heat is gradually lost to the cool air by conduction.

Build Your Own Log Cabin - How to Build a Log Cabin Yourself

Build Your Own Log Cabin - How to Build a Log Cabin Yourself - excerpt from the book "The Scientific American Boy" by A. Russell Bond
Our third expedition completed the number of logs we required for the log cabin. Two large 12-foot logs were chosen for the foundation logs at the front and rear of the building. The logs were flattened along the bottom so that they would have a firmer bearing on the ground, and particularly on the corners, where they rested on foundation stones. Each log was now notched about a foot from the ends. The notches were 8 inches long and about 2 inches deep. Care was taken to place those on one log squarely opposite the notches on the other. A pair of 14-foot logs were now laid across the foundation logs and rolled along them until another half-turn would have dropped them into the notches (shown in Fig. 266).

Fig. 266. Foundation Logs Notched.

Then notches were cut in the 14-foot logs to correspond, so that when the final half-turn was given one notch would fit over the other, making a mortise joint (Fig. 267).

Fig. 267. Foundation Logs Fitted Together.

When the side logs were in position notches were cut in their upper surface to receive a pair of 12-foot logs which were rolled onto them, notched and dropped into place. Then another pair of side logs were laid on, and so the work progressed. The notches in each log were cut to a depth equal to one-quarter the diameter of the log; that is, if the log was 8 inches in diameter the notch was made 2 inches deep, and if 6 inches in diameter it was cut to a depth of 1-1/2 inches. When the logs were laid in place no space intervened between them, as will be clearly understood by reference to Fig. 268.

Fig. 268. A Corner of the Log Wall.

We found, after a few logs had been set in place, that our cabin was growing faster at one end than at the other. The trouble was that our logs were not of uniform diameter throughout, and we had been laying the butt ends, which were larger, all at one end of the building. So we had to take down the logs and relay them with the butt end of the front foundation log at one end and that of the rear foundation log at the other. Then the cross logs were laid on with their butt ends on the small ends of the foundation logs. The next end logs were laid with their small ends on the butt ends of the cross logs, and so on, taking care never to lay the butt end of one log across the butt end of another. In this way the walls were built up evenly to a height of 3 feet.

We had planned to make a large open fireplace in the cabin, and this necessitated cutting an opening in the rear wall. But we did not want to cut the opening until the wall was built up to its full height lest it might buckle while the remainder of the logs were being placed in position. So we merely cut a piece out of the top log to make room for a saw when we were ready to cut the complete opening. As our fireplace was to be 5 feet in width, a 5-foot piece was cut out of the center of the log. Then the ends were supported by cleats nailed on each side, as shown in Fig. 269.
Fig. 269. Piece Cut Out to Admit Saw.

This done the building was continued as before, but as the walls grew we found it more and more difficult to raise the logs to position. We could not lift them directly to the top of the wall, but had to roll them up on “skids”; that is, on a pair of 14-foot logs which were laid against the top of the wall. When the walls had reached a height of about 5 feet above the foundation logs, a length 4 feet 9 inches long was cut out of the top log to allow space for sawing out the front door and window, and also a 30-inch piece was cut out for the side window. Cleats temporarily held the sawed ends of the logs, while the walls were carried on up to a height of a little over 6 feet from the foundation logs.
Fig. 270. Skids

The Roof of the Log Cabin.

Then we started laying the roof. A 16-foot log was now notched in place at each side, with its forward end projecting about 3 feet over the front of the cabin to form a shelter in front of the building. A pair of 12-foot logs were then laid in position. The next pair of 16-foot logs were laid about 20 inches in from the sides, and after a pair of the cross logs had been set in place a third pair of logs were laid about 40 inches from the sides. Finally, a single 16-foot log was set in place at the center, to serve as the ridge beam of the roof. The roof logs were all carefully tested to see if they were sound before we laid them in place, because we did not want to run any risk of the roof falling in, particularly in the winter time, when it would be heavily covered with snow. A chalk line was drawn from the ridge beam to the lower roof beam, and the cross logs were sawed off along this line, as indicated in Fig. 271.


Fig. 271. How the Roof Logs were Laid.

Several slabs were now procured and laid across the roof beams to serve as rafters. These rafters projected about 18 inches beyond the side walls of the cabin, so as to support the eaves. Over the rafters we laid a roofing of slabs, starting with the bottom and lapping them, as we had done on our tree house.

The Door and Window Frames.

We were now ready to cut out and frame the doors and window openings. The front window of the cabin was to be close beside the door, so we merely widened the door opening at the top to include the window opening as well (see Figs. 271 and 272). The door was made 2-1/2 feet wide, and was cut down to the foundation logs. The window opening was cut to a depth of 24 inches. Before sawing out the opening we wedged pieces of wood between the logs along the line we were to follow with the saw, so as to keep them in place. After the opening had been made a couple of stout boards were nailed to the sawed ends of the logs at each side, to hold them securely in place and make a suitable framing for the door. The cleats were then removed. The foundation log and the one at the top of the opening were flattened, to serve as the sill and lintel of the door. Between the door and window a short post was wedged in place. This post was flattened on opposite sides, so that the door jamb could be nailed against it on one side and the window frame on the other. The side window was next cut out and framed. After it had been framed it measured 2 feet square.

Fig. 272. The Finished Roof. 

The Fireplace.

Then came the task of building our fireplace. First we sawed out the opening, cutting right through the rear foundation log. Then we gathered from the river a large number of the flattest stones we could find. With these we planned to build the three outer walls of our chimney. But the question of getting mortar to bind the stones together bothered us for a while.
“If only we could find a bed of clay. Don’t any of you know of one around here?” queried Bill.
But none of us remembered seeing any clay bed in the vicinity.
“If we were in south Jersey now,” I said, “we could use some of that red mud they have down there. It sticks like the mischief to shoes and pant legs. I bet it would hold those stones together.”
"Red mud? Why there’s plenty of it over the hill, back of Lumberville,” said Reddy. “All the roads over there are red shale roads, and I saw some red banks along the river when we went after the logs.”
That was just what we wanted. The banks Reddy referred to turned out to be genuine red shale, and soon we had ferried several scow loads of the stuff down to Kite Island. When the shale was wet it made quite a sticky mortar. The foundations of the chimney were laid in a trench about 2 feet deep, and the side walls of the chimney were carried inside of the cabin and covered the ends of the logs at the chimney opening. The side walls extended outward a distance of 3 feet, where they were joined by the rear wall of the chimney.

The Proper Way to Build a Stone Wall.

In making our chimney we could not rely on the red shale to hold the stones as firmly as good lime mortar would, so we had to be careful that each stone, as it was laid, had a firm bearing. The stones were embedded in a thick layer of mud, and if they showed any tendency to teeter we propped them up by wedging small stones under them until they lay solid. Another thing that we were very careful about was to “break joints”; that is, to keep the joints in each layer of the stones from coinciding with those in the next layer, above or below. To make sure of this we made it a point to lay a stone over each joint in the top of the wall and then to fill in the space between the stones with smaller stones. In this way the wall was made very substantial.
When the masonry had been carried up to the top of the chimney opening, a heavy timber about 12 inches wide was laid across the walls close against the wall of the building. This was to support the fourth wall of the chimney, and so we flattened its upper surface. To prevent it from catching fire it was covered with a thick plastering of mud, and then to keep the mud from cracking and flaking off we procured a piece of tin and tacked it over the log. The tin also extended over the top log of the opening. Then we went on with the building of the chimney walls, carrying them up about a foot above the ridge of the roof. Our chimney was completed by paving the bottom with stones, well packed in mud and nicely smoothed off to make the hearth. The hearth extended about 18 inches into the cabin, and was framed with logs, as shown in Fig. 275.


Fig. 273. How to Build a Wall.

The Floor of the Cabin.

A number of logs were now laid on the ground to serve as floor beams. Slabs were used for the floor. We had some trouble in making the floor perfectly even, because the floor beams were rather irregular, and a great deal of time was spent in smoothing the logs off to a common level. If we had the work to do over again we would have bought two or three planks and laid them on edge to support the flooring.

Fig. 274. Building the Chimney.
Fig. 275. Section through the Fireplace.

The Door Hinges and Latch.

A door was now constructed by battening together a number of slabs. In place of a hinge a hole was drilled into the sill and another into the lintel directly in line with it. Two sticks of wood were then whittled to fit snugly, but without jamming, into these holes. These sticks were then nailed to the inner face of the door, with their whittled ends projecting into the holes, forming pintles on which the door could turn. A narrow strip of wood was nailed to the outer jamb for the door to close against.

Fig. 276. The Door Hinges.

The latch consisted of a stick of wood, fastened to the door at one end with a nail. It hooked onto a catch whittled out of hard wood to the form illustrated in Fig. 278, and nailed to the jamb. Then to keep the latch from dropping too far when the door was open, and to guide it when slammed against the catch, we whittled out a guard piece to the form illustrated in Fig. 277, and nailed this to the door, with the latch projecting through the slot of the guard. A string was now fastened to the latch and passed through a hole in the door. A block was tied to the end of the latch string to prevent it from slipping back through the hole; but at night, when we did not want to be molested by any intruders, we untied the block and drew in the latch string.


Fig. 277. The Latch Guard.            Fig. 278. Door Catch.

The Window Sash.

For our windows we made wooden sashes which fitted nicely into the window openings. A small hole was drilled through the sash at each side into the frame, and nails inserted in these holes held the sash in place, and served also as hinge pins for the sash to turn on. The sash could be taken out at any time by removing these nails. As we could not afford to use glass for our windows, we covered the sashes first with cloth, and later, when it occurred to us that in winter time it would be difficult to keep the cold air out, we used oiled paper.

Fig. 279. The Latch.

Bunks.

Our next work was directed toward providing sleeping accommodations in the log cabin. A large log was laid on the floor the full length of the cabin, as far out as possible without interfering with the opening of the front door. Stakes were laid across this log, with their opposite ends wedged in between the logs of the wall. A nail or two in each slab held it in place. This formed a sort of shelf 12 feet long, which was divided at the center to form two bunks, each wide enough for two persons. But as there were six of us in the society, we had to provide two more berths. A stout post was set into a hole in the ground, and nailed firmly at the bottom to the lower berth log and at the top to one of the roof beams. This post supported a second berth log, which extended the full length of the building at a height of about 3 feet from the floor, and was wedged at the ends between the logs of the house. Cleats were nailed to the walls under this berth log to make it perfectly secure. Then slabs were nailed across it to form the two bunks.

Fig. 280. Hinged Window Sash.
Fig. 281. Bunks.

Stopping up the Chinks.

The log cabin was completed by stopping up all the chinks between the logs of the walls. Strips of wood and bits of bark plastered with mud were driven into all the cracks and crevices until everything was made perfectly tight.

How to Keep Birds Away From Garden - A Garden-Bed Scarecrow

How to Keep Birds Away From Garden -  A Garden-Bed Scarecrow

A very neat and successful scarecrow for garden beds can be made as follows: A number of corks are procured, and a feather is stuck in each end of them, as shown. These are tied to a string, spacing them from 1 to 2 ft. apart, and the string is hung over the beds. The slightest breeze will keep them fluttering, and no bird will come to rest on the beds.
The Fluttering Feathers Attached to the String with Corks Scare the Birds Away

—Contributed by M. T. Canary, Chicago.

Excerpt from the book:
THE BOY MECHANIC - BOOK 2
1000 THINGS FOR BOYS TO DO
HOW TO CONSTRUCT DEVICES FOR WINTER SPORTS, MOTION-PICTURE CAMERA, INDOOR GAMES, REED FURNITURE, ELECTRICAL NOVELTIES, BOATS, FISHING RODS, CAMPS AND CAMP APPLIANCES, KITES AND GLIDERS, PUSHMOBILES, ROLLER COASTER, FERRIS WHEEL AND HUNDREDS OF OTHER THINGS WHICH DELIGHT EVERY BOY WITH 995 ILLUSTRATIONS
PUBLISHED 1915, BY H. H. WINDSOR CHICAGO
POPULAR MECHANICS CO. PUBLISHERS

Preserving Dried Flowers in Color and Form - How to Dry Flowers

One of the most distressing sides of botanical study is the short life of the colors in flowers. Those who have found the usual method of preserving plants by pressure between paper unsatisfactory will be interested to learn of a treatment whereby many kinds of flowers may be dried so that they retain a great deal of their natural form and color.
The flowers should be gathered as soon as the blossoms have fully opened. It is important that they should be quite dry, and in order to free them of drops of rain or dew, they may be suspended with heads downward for a few hours in a warm place. It is well to begin with some simple form of flower.

 
Placing the Flowers on the Steel Pins...

A large, strongly made wooden box—one of tin is better—will be necessary, together with a sufficient amount of sand to fill it. If possible, the sand should be of the kind known as "silver sand," which is very fine. The best that can be procured will be found far from clean, and it must, therefore, be thoroughly washed. The sand should be poured into a bowl of clean water. Much of the dirt will float on the surface. This is skimmed off and thrown away, and clean water added. The sand should be washed in this manner at least a dozen times, or until nothing remains but pure white grains of sand. The clean sand is spread out to dry on a cloth in a thin layer. When thoroughly dry, it should be placed in a heavy earthenware vessel and further dried in a hot oven. Allow it to remain in the oven for some time until it is completely warmed through so that one can scarcely hold the bare hands in it.

...and Pouring the Dry Sand around Them

Obtain a piece of heavy cardboard and cut it to fit easily in the bottom of the box. Through the bottom of the cardboard insert a number of steel pins, one for each of the flowers to be preserved. Take the dry blossoms and press the stalk of each on a steel pin so that it is held in an upright position. When the cardboard is thus filled, place it in the box.

The Dried Flowers

The warm sand is put in a bag or some other receptacle from which it can be easily poured. Pour the sand into the box gently, allowing it to trickle slowly in so that it spreads evenly. Keep on pouring sand until the heads of the flowers are reached, taking care that all of them stand in a vertical position. The utmost care must be taken, when the heads are reached, to see that all the petals are in their right order. Remember that any crumpled flowers will be pressed into any position they may assume by the weight of the sand. When the box is filled it should be covered and set aside in a dry place.

The box should be allowed to stand at least 48 hours. After the first day, if only a small amount of sand has been used, the material may have cooled off to some extent, and the box must be set in a moderately heated oven for a short time, but no great amount of warmth is advisable. After 48 hours the box may be uncovered and the sand carefully poured off. As the flowers are now in a very brittle condition, any rough handling will cause serious damage. When all the sand has been emptied, the cardboard should be removed from the box and each blossom taken from its pin. In the case of succulent specimens, the stems will have shrunk considerably, but the thinner petals will be in an almost natural condition. The colors will be bright and attractive. Some tints will have kept better than others, but most of the results will be surprisingly good. Whatever state the flowers are in when they are taken from the box, if the drying process has been thorough, they will keep almost indefinitely.

Flowers preserved in this manner are admirable for the decoration of homes. If they are exposed to light, care should be taken to see that the direct sunshine does not strike them, as it will fade the colors. Sprigs with leaves attached may be dried in this way, but it has been found that much of the intensity of the green is lost in the process.

THE BOY MECHANIC - BOOK 2
1000 THINGS FOR BOYS TO DO
HOW TO CONSTRUCT DEVICES FOR WINTER SPORTS, MOTION-PICTURE CAMERA, INDOOR GAMES, REED FURNITURE, ELECTRICAL NOVELTIES, BOATS, FISHING RODS, CAMPS AND CAMP APPLIANCES, KITES AND GLIDERS, PUSHMOBILES, ROLLER COASTER, FERRIS WHEEL
AND
HUNDREDS OF OTHER THINGS WHICH DELIGHT EVERY BOY WITH 995 ILLUSTRATIONS
PUBLISHED 1915, BY H. H. WINDSOR CHICAGO
POPULAR MECHANICS CO. PUBLISHERS

Candy Making Recipes - How To Make Candy At Home

From the Following Recipes and Formulae, Hundreds and Even Thousands of Candies Can Be Made.

Excerpt from the book:
MOTHER'S'  REMEDIES
Over One Thousand Tried and Tested Remedies from Mothers of the United States and Canada.
By DR. T. J. RITTER
PUBLISHED BY G.H. FOOTE  PUB. CO. DETROIT MICH 1921

Candy Making at Home

The proverbial "sweet-tooth" is a characteristic of the American people. Hundreds of tons of candy are annually consumed, and fortunes have been made in the business. The range of price is from ten cents to a dollar a pound, with some specially wrapped and boxed bonbons exceeding the latter price, not because of intrinsic excellence, but because of the ornamental form in which they are presented. Cheap candies are adulterated and hence more or less detrimental to health. Good candies are not harmful, unless eaten to excess. Delicious candy may be made at home at much less cost, and some famous candies, like the "Mary Elizabeth" and others, had their beginnings in a home kitchen and grew into popular favor because of their known purity and uniform excellence. The cost of ten one-pound boxes of candies is estimated at $1.50 when materials are bought in small quantities; such candies, placed on sale at church fairs, bazars, etc., are sold at forty and fifty cents per box. Even at twenty-five cents a box there is a profit of ten cents on each box. Any girl can prepare bon-bons for a luncheon or a party at home, if she is willing to take the trouble,--which is, after all, a pleasure to many. She may save her own candy boxes and by getting a supply of paraffin paper, fill them again with candies quite as good as those they originally contained; or buy new boxes of the paper box manufacturers at two or three cents apiece. A box of home-made candy makes a nice Christmas or birthday gift.

Boiling the Sugar

Confectioners recognize seven degrees in boiling sugar for candy, only four of which, however, are practically important. The first of these is the "thread" at about 215 degrees, by the sugar thermometer, when a short thin thread forms when thumb and forefinger are separated with a drop of syrup between them. This passes very quickly into a second stage, known as the large or long thread, when it can be drawn out to a considerably greater length without breaking. In a moment more it can be extended as far as the thumb and forefinger can be separated. The next stage is the "pearl," shown when the surface of the syrup is covered with bubbles, and is the stage at which much candy is made. The "blow" and "feather" come next; then the "ball" or fondant stage at 235 to 245 degrees; this is the third important stage. To discover when the boiling has progressed to this stage, drop a little of the syrup on to ice water, or dip the tips of the thumb and forefinger into ice water and then into the syrup and instantly into the ice water again with the syrup between. One can use a small stick in the same way. If the syrup can be rolled into a soft, but not sticky ball, it is in the soft ball stage; half a minute more of boiling will convert it into the "hard ball," if tested in the same manner. For fondant, the "soft ball" is chosen. The next is the "crack" or brittle stage, at about 300 degrees; when testing as above the syrup remains dry and hard on the fingers. This is the stage for candy that is to be pulled. At the caramel stage the syrup begins to brown, and must be quickly taken from the fire or it becomes "burnt sugar;" dropped in water it crackles and snaps.

Making the Fondant

Fondant ("foundation") is the basis of all French bon-bons, so-called. An endless number of varieties may be made from it in combination with other material. There are two ways of preparing it. The easiest and simplest way is to add to the white of an egg an equal bulk of cold water and a teaspoonful of vanilla; beat until it froths, then add, gradually, one pound or more, of confectioners' XXX sugar; if the egg is large, one and one-half pounds may be required. Ordinary sugar will not do. Add sugar until the mixture forms a stiff paste; work this with a spoon until it is very smooth, then put away in a cool place for at least twenty-four hours, letting it stand in an earthen dish, and cover with a doubled napkin wrung out of cold water.

French, or Boiled Fondant

Put into a porcelain lined kettle a pint of the best granulated cane sugar, half a pint of cold water and a salt spoon of cream of tartar dissolved in warm water. Stir it till the sugar is dissolved and boil rapidly without stirring or moving the kettle. Without a sugar thermometer it is impossible to tell exactly how many minutes it should boil, but usually in about ten minutes a little of the syrup dropped into cold water will form a soft waxy ball between the moistened fingers. It should then be removed from the fire and put in a cool place until the hand can rest with comfort on the bottom of the kettle. If too hot, it will turn back to sugar; if too cold, it will not thicken properly. In either case it is not spoiled, try again; add boiling water, stir until dissolved, and repeat the boiling. A little experience makes one to seize "the psychological moment" when the syrup is in the right condition. When the syrup has cooled to the degree indicated above, begin to stir it, using a long-handled wooden spoon. It will turn milky at first, then thick and white, finally dry on the edge of the dish and get so stiff it is difficult to stir. Then take the mass out on a marble slab and knead as you would bread dough; if you have no marble slab you may work it in the hands.

Flavor and Color

At this point add the flavoring. Make little holes in the fondant with the fingers and put in each a little of the flavoring, working it through the mass. The essential oils are better than extracts. Three or four drops of any of the oils will flavor a pound of fondant. Three cents worth would be sufficient for a number of pounds. The flavor should not be strong. About a teaspoonful of any extract will be sufficient. If it is desirable to have two or more flavors, divide the fondant into the required number of portions, and have an assistant take up the kneading of each. Work the fondant until it is creamy. The pure food laws discourage the use of colorings, and it is difficult for the amateur to procure them in economical quantities. Cochineal can always be had and provides any number of shades of pink. Spinach heated over steam, and the juice expressed, gives a pretty green which is perfectly harmless. Work into the fondant as you used the flavoring oil or extract. The above ingredients will make one pound of fondant, all the beginners should undertake at one time. It may be kept for some time by packing it in glass cans and sealing tightly. The fondant should "mellow" for at least twenty-¬four hours before being used, especially as centers for chocolate creams, etc.; and these in turn should stand as long before being dipped. It is also advisable to let the bon-bons stand a day at least before being wrapped and packed. Choose a dry, clear, quiet day to make fondant, and do not attempt to work with it in wet weather; it is very sensitive to atmospheric conditions.

Making the Bon-bons

After the fondant has stood the required interval it is ready to make up. Here comes in play the ingenuity of the candy maker in the employment of various accessories. Candied cherries, candied violets and rose petals, angelica, dates, figs, hard jel¬lies, raisins, white grapes, crystallized ginger, cocoanuts, marshmallows, nuts, all are employed, while chocolate is used in so many forms that it gives rise to an entire class of candies. When ready to make up the bon-bons, roll the fondant out evenly and cut in squares of equal size; shape these with the fingers. The hands must be frequently dipped into ice water and wiped dry, but never greased. Roll the fondant into a ball; while still in the hand, press into the top an English walnut meat, or whatever decoration is desired, and lay on paraffin paper to harden. Another class is made by using a nut meat, say a blanched almond or pecan meat, a raisin, etc., as center, and rolling the fondant round it. The ball may be rolled in beaten white of egg and then in coarse white sugar. By using various centers, and ornamenting the tops differently a great variety of bon-bons may be made; in fact, hundreds or even thousands can be worked out by changing the flavor, nuts, coloring, etc.

Chocolate Candies

If the American girl had to be restricted to one class of candies, there would be little doubt she would profess a preference for those prepared with chocolate.

Chocolate Cream Recipe

To make chocolate creams, roll the fondant into balls of uniform size; let them stand on paraffin paper twenty-¬four hours or more. Also coat nut meats, raisins, candied cherries, etc., with fondant. In making a small quantity of chocolate dipped candies, get a small bowl that will fit into the top of the teakettle; into this cut half a pound of unsweetened chocolate and a lump of paraffin as large as a black walnut, and let them melt; when smooth and well mixed let cool a little, and then set on a hot soapstone. Have ready a colander and a long darning needle. Cover the bottom of the colander with paraffin paper, stick the point of the needle into the piece to be dipped, immerse in the melted chocolate, let it drip a moment, then push the eye of the needle through one of the holes in the colander, reach the other hand under and pull out the needle. There then remains no disfiguring hole in the bottom of the cream. When the colander is filled, lift the paper very, very carefully, and put in a cool place to harden. Unless the colander must be used again it is best to let the creams stand in it to harden. Nut meats, white grapes, candied cherries and the like, may be dipped in the melted chocolates and coated like the creams. If the chocolate gets too thick, thin it with a little olive oil or unsalted butter; not with water which will make it grain.

Chocolate Cream Recipe No. 2

Put two cups of granulated sugar into half a cup of sweet cream. Boil five minutes from the time it begins to boil hard. Set the pan into cold water and stir in the flavoring, a teaspoonful of vanilla, usually. Stir until the candy is so stiff that stirring is difficult; drop from a spoon on waxed paper; as it hardens, mould into balls, and dip in chocolate as above.

Chocolate Candy Recipe, Plain

Melt a square of unsweetened chocolate and stir into plain fondant, flavoring generously with vanilla.

Chocolate Caramels Recipe

Put together over the fire one cup of molasses and two teacupfuls of sugar. Add a quarter of a pound of grated chocolate and a piece of butter the size of an egg. Boil, without stirring, fifteen to twenty minutes; pour into flat buttered dishes to a depth of one-third of an inch, and when nearly cold cut into squares. Wrap each in a square of paraffin paper.

Chocolate Nut Caramels Recipe

Boil together a cup of molasses, a cup of sugar and half a cup of sweet milk until a little hardens in cold water. Cut into it a piece of butter the size of an egg and add a cup of chopped nuts. Proceed as above.

Chocolate Fudge Recipe

Put into a porcelain lined pan two cups of granulated sugar, four sections of unsweetened chocolate, grated, one cup of milk and two rounded tablespoonfuls of butter. Cook, stirring constantly, for twenty minutes. Dip out a little of the mixture, put on a cold plate, and if it is done it will form a soft pliable paste. Flavor generously with vanilla, beat hard for a few minutes, then turn into buttered pans and cut into squares while warm.

CHOCOLATE CANDIES. Cocoanut Cream Bars

Boil three pounds of granulated sugar, one cup of cold water and half a teaspoon¬ful of cream of tartar until thick--or in the "ball" stage. Let cool slightly, then beat until creamy. Have ready a large cocoanut, grated; mix and stir well, then pour into shallow tins covered with buttered paper. When cold, cut into bars. Let stand a day or two before using.

Cocoanut Caramels Recipe

Three pounds of granulated sugar, one cup of milk, a tablespoonful of butter and two teaspoonfuls of lemon extract. Put into a kettle, stir till dissolved; add one grated cocoanut and boil to the "pearl" stage. Pour into buttered pans, after it has cooled a little mark off into squares, and when cold break apart. Use when quite fresh.

Cocoanut Snow Balls Recipe

Knead dessicated cocoanut into fondant; make into balls, and roll in grated cocoanut. Dessicated cocoanut may be used but is not as good as grated cocoanut.

MAPLE CANDIES. Maple Creams

Beat thoroughly one cup of the best maple syrup and the while of one egg. With XXX confectioners' sugar, make it into a stiff fondant or paste. Use as the centers for bon-bons, or make into balls to be dipped into chocolate.

Maple Creams No. 2.

To two pounds of maple sugar add a cup of water and a quarter teaspoonful cream of tartar. Shave the sugar, and stir till dissolved. Boil without stirring to the soft ball stage; let stand in the kettle until cool, not cold; beat until creamy and pour into a shallow buttered pan.

Maple Balls Recipe

Boil without stirring, two cups of shaved maple sugar and a cup of water. At the hard ball stage add a heaping table¬spoonful of good butter. Beat till creamy. As soon as it can be handled form into balls and press the half of an English walnut or pecan on one side.

WAFERS

To make wafers, boil without stirring two cups of granulated sugar, a half cup of water. When it will "spin a thread" set the kettle in cold water and beat till creamy. Flavor with pepper¬mint, wintergreen, cinnamon, or any flavor you choose. Squeeze through a pastry tube upon paraffin paper in quantities that will spread to the size of a quarter dollar.

Chocolate Peppermint Wafers

Take some of the fondant prepared as above, flavor rather strongly with peppermint and dip in sweet chocolate.

MOLASSES CANDIES

Nothing pleases children more than a "candy pull." Turn them loose in the kitchen and let them make molasses taffy.

Molasses Taffy Recipe

Boil a cup of good Porto Rico molasses, a cup of brown sugar and a piece of butter the size of an egg until a little will harden, in cold water. Cool on buttered plates, and as soon as it can be handled grease the fingers and pull till hard and light colored. To prevent boiling over, grease the edge of the pan or kettle in which it is boiled.

Molasses Taffy No. 2

Four cups of sugar, two of molasses, half a cup of vinegar. Boil till it hardens in cold water, then add a table¬spoonful of soda dissolved in a little water. Pour into buttered dishes and pull when sufficiently cool to handle.

Butter Scotch

One cup of each of sugar and molasses, half a cup of vinegar, one tablespoonful of butter and a quarter teaspoonful of soda.

Nougat Recipe - Homemade Nougat Recipe

Nuts intended for nougat should be blanched, skinned and dried. Melt in a porcelain lined vessel, one pound of fine white sugar with two tablespoonfuls of water, stirring continually with a wooden spoon. Heat the nuts in the oven, after chopping them, add to the syrup, and stir for five minutes. Remove from the fire and add a little grated lemon rind. Oil a flat pan; place it in a warm place on the range and pour the candy into it. When brown, turn out of the mould, cut in cubes and wrap in oiled paper.

Nut Bars Recipe

Chop any kind of nutmeats you prefer, or a mixture of nuts, moderately fine. Butter a shallow pan and spread the nuts evenly over the bottom. Boil one pound of granulated sugar with half a cup of water and a pinch of cream of tartar till thick, but not too brittle. Pour over the nuts and set aside to cool. When it begins to harden mark into bars with a sharp knife. Let stand several days, when it becomes soft and delicious.

Nut Loaf Recipe

Chop nutmeats into small pieces and work into fondant. Make into a roll, and after standing a day or two, cut into slices. Chopped dates, figs and raisins may be used in the same way.

Peanut Candy Recipe

Carefully remove the shells and brown skins from roasted peanuts. Put them an inch thick in a buttered pan. Boil a pound of crushed loaf sugar with three gills of water and a salt spoon of cream of tartar (to prevent graining) dissolved in water, to the caramel stage. The instant the sugar reaches that point, shown by its beginning to brown, it must be removed from the fire and the pan set in cold water to check the boiling; then pour over the nuts.

Pop Corn Candy Recipe

Boil two cups of sugar, two tablespoonfuls of butter and a cup of water until it threads. Stir in four quarts of nice popped corn, rejecting all hard kernels, take from the fire and stir till cool. Make into balls.

Popcorn Baskets Recipe

Prepare the corn as above, instead of making into balls, butter the bottoms of tumblers and press the candy around them to form little baskets, in which ice cream may be served or which may be filled with candies.

Sour Drops Recipe

Strain the juice of three or four large lemons into a bowl, and stir in powdered loaf sugar till it is quite thick. Put into a pan and let boil five minutes, stirring constantly. Drop from the end of a spoon upon writing paper, and when dry keep in tin cannisters. Tartaric acid is generally used by commercial candy makers, but is much more injurious to health.

Crystallized Fruits.--Other Candies

Boil two cups of granulated sugar with two-thirds of a cup of water until it hardens in cold water, do not stir. When it is brittle without being sticky, it is ready to use. Dip the fruit to be candied, sections of oranges, white grapes, cherries, squares of pineapple, etc., into this, and lay on paraffin paper. Dip a second time after the first has hardened, to ensure a good coat. Use the same rule for the syrup to glace nuts.

Cream Dates

Remove the stones from nice dates. Replace them with the roll of flavored fondant. Or roll a blanched almond in fondant and stuff the date with it.

Hoarhound Candy Recipe

Boil the hoarhound in a little water till the strength is extracted. Make a sugar syrup, adding the hoarhound to it; let it boil up and stir against the sides of the pan until it thickens. Pour out on paraffin paper dusted with fine sugar, and cut into squares.

Marshmallows Recipe

Dissolve over a slow fire eight ounces of best gum arabic in three gills of water. Boil one ounce of marshmallow roots in a little water for half an hour. Strain, and boil down. Put this and the gum arabic solution with half a pound of loaf sugar, let it cook slowly till it makes a paste that can be rolled between the fingers to the "soft ball" stage. Then add the beaten whites of two eggs; when well mixed pour in a pan which should be lined with white paper, with enough projecting over the sides so that as the mixture cools it can he lifted out and cut in cups with a sharp knife, then rolled in powdered sugar.

Marrons Glaces Recipe

Remove the shells from a quart of large Italian or French chestnuts. Let stand fifteen minutes in boiling water. Drain; rub off the skin; cover again with boiling water and simmer gently half an hour or till tender, but not soft. Drain in a sieve. Boil together one cup of granulated sugar and one cup of water; add the nuts and simmer until they begin to look clear. Make another syrup of one pound of granulated sugar and one cup of water; boil till it will spin a thread, add a teaspoonful of lemon juice and set aside till it cools a little; then beat till it begins to turn white. Set in a basin of hot water, flavor with vanilla, and when melted to a syrup, dip each nut. When coated, lay on paraffin paper to dry. These sugared chest¬nuts are highly esteemed as a sweetmeat and are expensive to buy.

Stick Candy Recipe

Three pounds of granulated sugar, two cups of water, one teaspoonful of cream of tartar dissolved in a little warm water. Stir over the fire till the sugar is dissolved; cover the kettle while the syrup is boiling and skim carefully a few drops. When it will harden in cold water, take from the fire and add the flavoring and coloring, then pour on well buttered plates. When cool, pull, and make into sticks or mark off into squares.

School Girl's Delight

Two cups of white sugar, three-fourths cup of golden color corn syrup and a quarter cup of water. Put into a granite sauce pan and boil till a little will crisp in cold water. Beat the whites of two eggs very stiff in a large bowl; pour the syrup very slowly into the bowl, beating the while, and beat and stir until it begins to harden. Then add one teaspoonful of vanilla, half a cup of chopped nutmeats, and five cents worth of dates, cut up with the scissors. Pour upon oiled paper in a flat pan and cut in squares. Those who eat this candy will ask to have it made again.

A Few Hints

Many candy makers consider coffee A sugar, better than the granulated, as being purer. Choose a sugar that is dry, uniform in quality and with hard, sparkling crystals. Cane sugar is greatly to be preferred over beet sugar. When you can, let the sugar and water stand together for some time. The syrup may be stirred until it reaches the boiling point, but not afterward. Unless otherwise specified, cook over a hot fire. The syrup passes quickly from one degree to another and must be tested often and carefully. Cream of tartar must be dissolved in a little warm water before being put into the syrup. So also must soda. If you use nuts, be careful to remove every particle of shell and skin before putting them into the syrup. Almonds are blanched by letting them stand in boiling water for a few minutes and then nipping off the skins between the fingers. They should be warmed in the oven before being put into the syrup. Dessicated cocoanut should be steamed a few minutes before being used; put in a dish in a colander over boiling water. Use the fresh cocoanut if you can get it. Bonbons made of fondant are probably the easiest form of candy making for the amateur to attempt, and the most interesting on account of the variety possible through the use of other materials in combination.

Excerpt from the book:
MOTHER'S'  REMEDIES
Over One Thousand Tried and Tested Remedies from Mothers of the United States and Canada.
By DR. T. J. RITTER
PUBLISHED BY G.H. FOOTE  PUB. CO. DETROIT MICH 1921
How to Remove a Tight Ring From a Finger With String

When a ring cannot be removed easily from the finger, take a string or thread and draw one end through between the ring and the flesh.
Coil the other end of the string around the finger covering the part from the ring to and over the finger joint.
Uncoil the string by taking the end placed through the ring and at the same time keep the ring close up to the string.
In this way the ring can be easily slipped over the knuckle and off from the finger.

Wrapping the Finger

—Contributed by J. K. Miller, Matietta, Penn.

Excerpt from the book:
THE BOY MECHANIC
VOLUME I
700 THINGS FOR BOYS TO DO
WITH 800 ILLUSTRATIONS
1913, BY H. H. WINDSOR CHICAGO
POPULAR MECHANICS CO. PUBLISHERS

Humane Rat Trap - How to Make a Rat Trap

1. Humane Rat Trap

A boy, while playing in the yard close to a grain house, dug a hole and buried an old-fashioned fruit jug or jar that his mother had thrown away, says the Iowa Homestead.
The top part of the jug was left uncovered as shown in the sketch, and a hole was broken in it just above the ground.
The boy then placed some shelled corn in the bottom, put a board on top, and weighted it with a heavy stone.
Humane Rat Trap
Humane Rat Trap

The jug had been forgotten for several days when a farmer found it, and, wondering what it was, he raised the board and found nine full-grown rats and four, mice in the bottom.
The trap has been in use for some time and is opened every day or two and never fails to have from one to six rats or mice in it.

2. Live Mouse Trap

A piece of an old bicycle tire and a glass fruit jar are the only materials required for making this trap.

Push one end of the tire into the hole, making sure that there is a space left at the end so that the mice can get in.
Then bend the other end down into a fruit jar or other glass jar.
Bait may be placed in the jar if desired, although this is not necessary.
Live Mouse Trap

Excerpt from the book: THE BOY MECHANIC - VOLUME I - 700 THINGS FOR BOYS TO DO
WITH 800 ILLUSTRATIONS - 1913, BY H. H. WINDSOR CHICAGO - POPULAR MECHANICS CO. PUBLISHERS

3. Buy Humane Rat Trap from Amazon


4. Youtube videos - How to Make Humane Rat Trap

Wooden Waste-Paper Basket - HOW TO MAKE IT

A MISSION WASTE-PAPER BASKET

Excerpt from the book:
Mission Furniture - HOW TO MAKE IT - PART I
POPULAR MECHANICS HANDBOOKS CHICAGO,
Printed 1909


Waste-Paper Basket to Match Library Table

The basket shown in the accompanying sketch is designed to be used with a library table having slats in the ends and wooden handles on the drawers. The finish is made to match that of the table by fuming, when completely assembled, in a large-size size, clean garbage can, with fumes of concentrated ammonia.


Detail of Waste-Paper Basket

The following quarter-sawed white-oak stock should be procured in the exact dimensions given. This may be had, planed and cut to lengths, from a mill for a slight extra charge. It is advisable not to have them sandpapered, as the very coarse sandpaper generally used, gives a bad surface for finishing.

    4 posts, 1-1/4 by 1-1/4 by 16-1/2 in., S-4-S.
    4 rails, 3/4 by 3 by 10-1/4 in., S-2-S.
    4 rails, 3/4 by 2 by 10-1/4 in., S-2-S.
    12 slats, 3/8 by 2-1/4 by 9-1/2 in., S-2-S.
    4 handle pieces, 1 by 1 by 2-1/2 in., S-4-S.
    2 handle pieces, 1/2 by 1/2 by 6 in., S-4-S.
    1 bottom, 3/8 by 9-1/2 by 9-1/2 in., S-2-S.

See that the posts are absolutely square cross section. Mark with a pencil—not gauge—the chamfers on the ends of the posts and plane them off.

Carefully mark the tenons on the ends of all the rails with a knife and gauge lines. Be sure that the distance from the tenon shoulder at one end of rail to the shoulder at the other end is exactly the same on each rail. Cut the tenons, using a backsaw and chisel.

Arrange the pieces as they are to stand in the finished basket, and number each tenon and mortise. Mark all the mortises on the posts, being sure to keep the distances between the top and lower rail the same on each post. Cut each mortise to fit the correspondingly numbered tenon. Next, mark the mortises for the slats in the rails, allowing the whole slat to go in 1/4 in.

The handles are next in order. The pieces going into the rail should be fastened with a round [96] 1/2-in. tenon cut on one end and glued in place. The crosspiece should be mortised all the way through these pieces and held in place by a brad from the under side.

Now put the whole basket together without gluing, in order that errors, if any, may be detected.

If everything fits perfectly, the basket is ready to be glued. For best results hot glue should be used. First glue up two opposite sides with the slats in place. Clamps must be used. When these have set for at least 24 hours, the other rails and slats may be glued in place and clamped. It is a good idea to pin the tenons in place with two 1-in. brads driven from the inside.

The handles are then glued in place, using hand screws to hold them until the glue sets. The bottom should rest on thin cleats, without being nailed to them, so that it may be removed when the basket is to be emptied of small papers, etc.

Before applying the stain, see that all glue spots are removed and all surfaces sanded to perfect smoothness. If a fumed finish is not desired, any good stain may be used, after which a thin coat of shellac and two coats of wax should be applied. Allow plenty of time for drying between the coats.

STYLES OF CHAIRS - THE 40 STYLES OF CHAIRS (embracing the period from 3000 B.C. to 1900 A.D.)

STYLES OF CHAIRS - THE 40 STYLES OF CHAIRS (embracing the period from 3000 B.C. to 1900 A.D.)

Excerpt from the book:
Mission Furniture - HOW TO MAKE IT - PART I
POPULAR MECHANICS HANDBOOKS CHICAGO,
Printed 1909


There are 40 distinct styles of chairs embracing the period from 3000 B.C. to 1900 A.D.—nearly 7,000 years. Of all the millions of chairs made during the centuries, each one can be classified under one or more of the 40 general styles shown in the chart. This chart was compiled by the editor of Decorative Furniture. The Colonial does not appear on the chart because it classifies under the Jacobean and other styles. A condensed key to the chart follows:

Egyptian chair.—3000 B.C. to 500 B.C.  

Seems to have been derived largely from the Early Asian. It influenced Assyrian and Greek decorations, and was used as a motif in some French Empire decoration. Not used in its entirety except for lodge rooms, etc.

Greek chair—700 B.C. to 200 B.C. 

Influenced by Egyptian and Assyrian styles. It had a progressive growth through the Doric, Ionic and Corinthian periods. It influenced the Roman style and the Pompeian, and all the Renaissance styles, and all styles following the Renaissance, and is still the most important factor in decorations today.

Roman chair—750 B.C. to 450 A.D. 

Rome took her art entirely from Greece, and the Roman is purely a Greek development. The Roman style "revived" in the Renaissance, and in this way is still a prominent factor in modern decoration.

Pompeian chair .—100 B.C. to 79 A.D. 

Sometimes called the Grecian-Roman style, which well describes its components. The style we know as Greek was the Greek as used in public structures. The Pompeian is our best idea of Greek domestic decoration. Pompeii was long buried, but when rediscovered it promptly influenced all European styles, including Louis XVI, and the various Georgian styles.

Byzantine chair.—300 A.D. to 1450 A.D. 

The "Eastern Roman" style, originating in the removal of the capital of the Roman Empire to Constantinople (then called Byzantium). It is a combination of Persian and Roman. It influenced the various Moorish, Sacracenic and other Mohammedan styles.

Gothic chair.—1100 to 1550. 

It had nothing to do with the Goths, but was a local European outgrowth of the Romanesque. It spread all over Europe, and reached its climax of development about 1550. It was on the Gothic construction that the Northern European and English Renaissance styles were grafted to form such styles as the Elizabethan, etc.


Chairs 1

Moorish chair.—700 to 1600. 

The various Mohammedan styles can all be traced to the ancient Persian through the Byzantine. The Moorish or Moresque was the form taken by the Mohammedans in Spain.

Indian chair.—2000 B.C. to 1906 A.D. 

The East Indian style is almost composite, as expected of one with a growth of nearly 4,000 years. It has been influenced repeatedly by outside forces and various religious invasions, and has, in turn, influenced other far Eastern styles.

Chinese chair.—3500 B.C. to 1906 A.D. 

Another of the ancient styles. It had a continuous growth up to 230 B.C., since when it has not changed much. It has influenced Western styles, as in the Chippendale, Queen Anne, etc.

Japanese chair.—1200 B.C. to 1906 A.D. 

A style probably springing originally from China, but now absolutely distinct. It has influenced recent art in Europe and America, especially the "New Art" styles.

Italian Gothic chair.—1100 to 1500. 

The Italian Gothic differs from the European and English Gothic in clinging more closely to the Romanesque-Byzantine originals.

Tudor chair.—1485 to 1558. 

The earliest entry of the Renaissance into England. An application of Renaissance to the Gothic foundations. Its growth was into the Elizabethan.

Italian Renaissance chair, Fifteenth Century.—1400 to 1500. 

The birth century of the Renaissance. A seeking for revival of the old Roman and Greek decorative and constructive forms.

Italian Renaissance chair, Sixteenth Century.—1500 to 1600. 

A period of greater elaboration of detail and more freedom from actual Greek and Roman models.

Italian Renaissance chair, Seventeenth Century.—1600 to 1700. 

The period of great elaboration and beginning of reckless ornamentation.

Spanish Renaissance chair.—1500 to 1700. 

A variation of the Renaissance spirit caused by the combination of three distinct styles—the Renaissance as known in Italy, the Gothic and the Moorish. In furniture the Spanish Renaissance is almost identical with the Flemish, which it influenced.

Dutch Renaissance chair.—1500 to 1700. 

A style influenced alternately by the French and the Spanish. This style and the Flemish had a strong influence on the English William and Mary and Queen Anne styles, and especially on the Jacobean.

German Renaissance chair.—1550 to 1700. 

A style introduced by Germans who had gone to Italy to study. It was a heavy treatment of the Renaissance spirit, and merged into the German Baroque about 1700.

Francis I chair.—1515 to 1549. 

The introductory period when the Italian Renaissance found foothold in France. It is almost purely Italian, and was the forerunner of the Henri II.

Henri II chair.—1549 to 1610. 

In this the French Renaissance became differentiated from the Italian, assuming traits that were specifically French and that were emphasized in the next period.

Louis XIII chair.—1616 to 1643. 

A typically French style, in which but few traces of its derivation from the Italian remained. It was followed by the Louis XIV.

Elizabethan chair.—1558 to 1603. 

A compound style containing traces of the Gothic, much of the Tudor, some Dutch, Flemish and a little Italian. Especially noted for its fine wood carving.

Jacobean chair.—1603 to 1689. 

The English period immediately following the Elizabethan, and in most respects quite similar. The Dutch influence was, however, more prominent. The Cromwellian, which is included in this period, was identical with it.

William and Mary chair.—1689 to 1702. 

More Dutch influences. All furniture lighter and better suited to domestic purposes.


Chairs 2

Queen Anne chair.—1702 to 1714. 

Increasing Dutch influences. Jacobean influence finally discarded. Chinese influence largely present.

Louis XIV chair.—1643 to 1715. 

The greatest French style. An entirely French creation, marked by elegance and dignity. Toward the end of the period it softened into the early Rococo.

Georgian chair.—1714 to 1820. 

A direct outgrowth of the Queen Anne, tempered by the prevailing French styles. It includes Chippendale, Hepplewhite and Sheraton, but these three great cabinetmakers were sufficiently distinct from the average Georgian to be worthy separate classification.

Chippendale chair.—1754 to 1800. 

The greatest English cabinet style. Based on the Queen Anne, but drawing largely from the Rococo, Chinese and Gothic, he produced three distinct types, viz.: French Chippendale, Chinese Chippendale and Gothic Chippendale. The last is a negligible quantity.

Louis XV chair.—1715 to 1774. 

The Rococo period. The result of the efforts of French designers to enliven the Louis XIV, and to evolve a new style out of one that had reached its logical climax.

Hepplewhite chair.—1775 to 1800. 

Succeeded Chippendale as the popular English cabinetmaker. By many he is considered his superior. His work is notable for a charming delicacy of line and design.

Louis XVI chair.—1774 to 1793. 

The French style based on a revival of Greek forms, and influenced by the discovery of the ruins of Pompeii.


Sheraton chair.—1775 to 1800. 

A fellow cabinetmaker, working at same time as Hepplewhite. One of the Colonial styles (Georgian).

R. & J. Adam chair.—1762 to 1800.

Fathers of an English classic revival. Much like the French Louis XVI and Empire styles in many respects.

Empire chair.—1804 to 1814. 

The style created during the Empire of Napoleon I. Derived from classic Roman suggestions, with some Greek and Egyptian influences.

New Arts chair.—1900 to date. 

These are various worthy attempts by the designers of various nations to create a new style. Some of the results are good, and they are apt to be like the "little girl who had a little curl that hung in the middle of her forehead," in that "when they are good they are very, very good, but when they are bad they are horrid."