Excerpt from the book: "Carpentry & mechanics for boys: up-to-the-minute handicraft" by Hall, A. Neely (Albert Neely), Publication date 1918 / Publisher Boston: Lothrop, Lee & Shepard Co.
This toy submarine dives then returns to the surface.
The Mechanism is best understood by referring to the diagrams of Figs. 269 and 270. The central section D is a tin can filled with sand, for ballast. One end is supported upon a brad, the other end upon the trigger E. Trigger E is held by catch J, which slips into a notch cut in the edge of E. Can D is of sufficient weight when filled with sand, to sink the submarine. When the submarine reaches the bottom of the bath-tub — a tub furnishes a good "zone" for operations — nail F in trigger E comes in contact with the tub bottom with sufficient force to throw trigger E out of position and release catch Ј.
Catch Ј is sprung out of the way by rubber-band K, trigger E is sprung out of the way by rubber-band G (see dotted lines in Fig. 269), and can D is released. Relieved of its ballast, the submarine rises to the surface. To make the boat dive again, it is but necessary to attach the tin can and reset the trigger.
Instead of having the submarine dive, discharge its weight, and instantly rise to the surface, you can make the trigger mechanism less delicate, so that it will not be sprung by slight contact. Then a gentle submersion to the tub bottom will not bring about the springing of the trigger, and the boat will remain upon the bottom. With a stream of water from a bath-spray forced against the stern, the boat may be propelled forward, and by directing the force of the stream against different portions of the boat you can cause the boat to go through all sorts of maneuvers, even to rising nearly to the surface.
Finally, by driving the contact point forcibly against the foot of the bath tub, or against an obstruction placed on the tub bottom, the trigger may be sprung, and the boat, relieved of its weight, will rise to the surface.
The simplicity of the work in making this mechanical toy will surprise you.
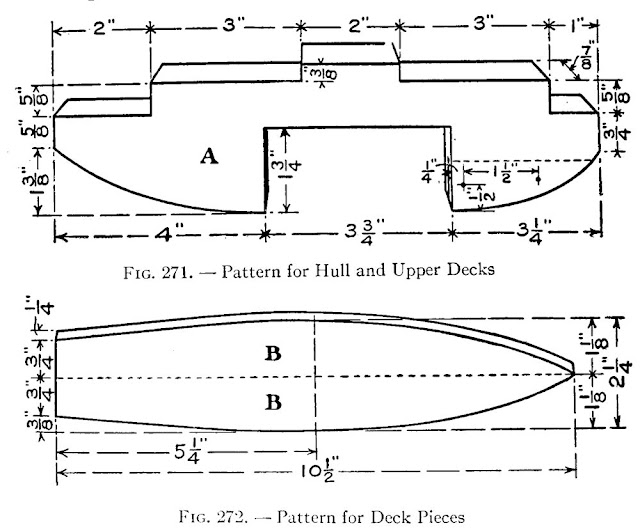
Figure 271 shows a pattern for The Hull and Upper Decks (A), which are made in one piece. Radii for describing the arcs for the bow and stern of the hull are not given, because after you have located the points for the beginning and end of these curves, as shown, you can easily draw them free-hand. The cutting can be done with a saw and chisel. Cut the ends of the pocket for the tin can weight with a saw, then split out the wood between the saw cuts, or kerfs, with a chisel. Taper the sides of the bow as shown in Figs. 268 and 273.
Figure 272 shows a pattern for deck pieces B. Lay these out in one piece, as indicated, cut out the piece, saw it in half, and nail the halves to the sides of block A in the positions shown (Figs. 269, 270, and 274).
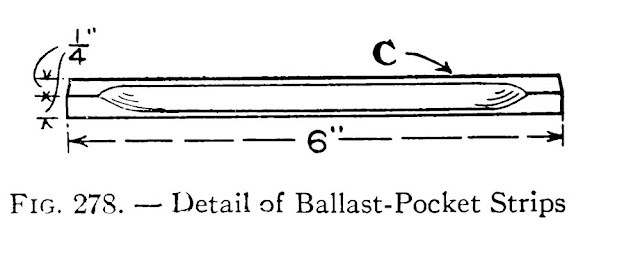
Strips C (Fig. 269) are fastened each side of block A (Fig. 270), directly below deck pieces B, to complete
The Ballast Pocket for can D. Figure 278 shows a pattern for these pocket strips. For the can ballast procure a 1/4-pound baking-powder can. Pack this full of sand, and if the cover fits loosely, coat the edge with paint to make it stick fast.
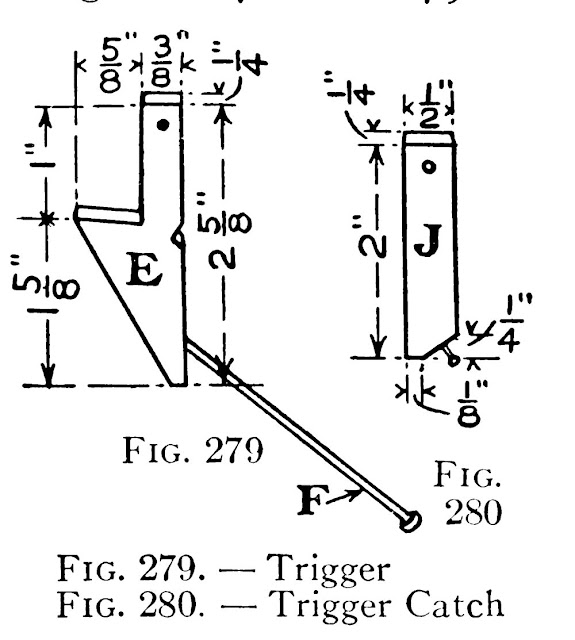
Figures 276 and 279 show details of The Trigger for Releasing the Ballast. Drive the nail F, a 3-inch finishing-nail, into the edge of the trigger at the angle shown. Figures 277 and 280 show how the trigger catch J is made. The bow of the hull must be slotted to receive the upper ends of trigger E and catch Ј, as indicated in Figs. 271 and 273.
The sides of the slot can be sawed down to the depth indicated by a dotted line in Fig. 271, then the wood between the saw kerfs can be split out with a chisel. Use brads for pivoting the trigger and catch blocks between the sides of the slot. Positions for the pivots are located in Fig. 271.
Figure 269 and Figs. 273 to 277 explain the assembling and adjustment of the trigger and catch blocks, also of the rubber-bands for springing them.
Rubber-band G extends from contact nail F to a screw I in the bow (Figs. 273 and 276). To keep it from interfering with rubber-band K, which extends from a brad in the lower end of catch J to screw I (Figs. 273 and 277), rubber-band G is run up and over a pair of brads (#) driven into block A upon opposite sides, then over to screw I (Fig. 273).
When you have connected the trigger mechanism, you will probably find slight readjustments necessary to bring about a nicety of operation. To support the stern end of the tin can, drive a brad into block A in the position indicated in Fig. 273. The projecting rim on the can bottom will rest upon the head of this brad.
This type of submarine has two Periscopes. Two brass screw-hooks 2 inches in length (L, Fig. 269) answer the purpose. Screw a round-head screw (M, Figs. 269 and 273) into the bow end of the second deck.
Painting.
Use a battleship-grey in painting the toy submarine. Remove the rubber-bands, to keep them from being gobbed with paint, and sandpaper all surfaces smooth.
Submerging the Submarine Upon Lake or Pond can be done successfully if provision is made for recovering the tin can ballast. Try this scheme. Connect one end of a line to the tin can, and retain the other end of the line in your hand. After the ballast has been released, it will be easy enough to pull it out of the water by means of the line.


Social Plugin