Excerpt from the book: "Our boys; what they can do and how to do it" by Stoddart, William, Publication date 1893 / Publisher New York, Hunt & Eaton; Cincinnati, Cranston & Curts
Perhaps some of you think it is a difficult matter to make a banjo, but this is not so, as I know from personal experience. It is a much more difficult matter to make a violin than a banjo, and if you have ever made a violin I am sure you will succeed with this. I have made a number of banjos, and I am going to tell you how to do it. If you can, borrow a banjo from one of your friends to look at as a model, as it will make it considerably easier for you to understand what is meant by the different figures. We will commence with the neck and fingerboard.
Get a sound and straight grained piece of maple 33 inches long, 2 1/4 inches wide, and 2 1/8 inches thick when planed smooth on all sides. If you cannot get maple a good piece of white pine will do and will be easier to work, but, if you can get it and are not afraid of a little harder work, I would advise you to use the maple. Take the piece and lay it before you, with the 2 1/8x33 uppermost, and draw the neck upon it, as in Fig. 1.

This is the upper view of the neck and fingerboard. Make the dimensions as follows: From A to B, the fingerboard, is 18 inches, from A to a is 5 inches, from A to b is 5 1/2 inches. The strip G is 1 inch wide and 10 inches long. The width at A is 1 3/8 inches, the width at B is 2 1/4 inches. At b it is 1 1/2 inches wide, and then it takes a curve of 1/4 inch outward, so that immediately below b it is 1 3/4 inches wide. At B and C it is slightly curved so as to fit the head of the banjo. The upper part of the neck, a, in which the pegs are placed, may be drawn like the figure or the sides may be left straight. Cutting it like the figure looks neater, however, and requires only a little more work. After you have carefully drawn this figure proceed to saw or cut away the outside wood. Now you have the neck in a rough state. The under side of the neck, F to a, Fig. 1, should be nicely rounded and smoothed. The head, a, should also be rounded and smoothed. If you have a model to look at you will see how the edges are finished. Now take a 1/4 or a 5/16 inch bit or drill and bore four holes in the head for the pegs to go in. The head, a, has a drop of about 1 1/2 or 1 3/4 inches, so that the holes must be bored perpendicular with respect to the head. They are about 1 3/8 inches apart, and the lower two are about 2 1/2 inches from the upper two. In boring these holes be careful not to split the wood. If you are afraid that you will split the wood take a 1/4 inch iron rod and burn the holes through. In burning the holes you must be very careful, however, as it is quite difficult to get them perfectly round, and if they are not round the pegs will not fit accurately. Also bore or burn a hole in the side of the neck at 0, Fig. 1, for the short side peg. Having put the finishing touches to the neck with fine sandpaper, so that it is all perfectly smooth, you can stain it.
Either mahogany or an ebony stain is good. For staining the wood a mahogany color brush it two or three times with a strong boiling decoction of logwood chips, and when thoroughly dry put on two coats of brown shellac varnish. Then carefully sandpaper and polish it and put on a final coat of shellac varnish. For an imitation ebony stain wash the wood three or four times with a boiling decoction of logwood chips, allowing it to dry between each application.
Then wash it with a solution of acetate of iron, which is made by dissolving iron filings in vinegar. This stain is very black, and penetrates to a considerable depth in the wood. The mahogany stain is very nice for the neck and hoop, while the trimmings, such as the pegs, tailpiece, etc., are stained in ebony. After you have the neck stained mark off the frets on the finger board, as shown in Fig. 3.

You can get the raised metal frets and put them on, or you can simply mark them on the finger board. Most banjos have marked frets. The distance between the frets is given; the frets, or marks, are themselves 1/16 of an inch wide. From A, the upper end of the finger board, to the first fret is 1 3/8 inches. The distance between the 1st and 2d frets is 1 5/16 inches;
- between 2d and 3d, 1 3/16;
- between 3d and 4th, 1 1/8
- between 4th and 5th, 1 1/16;
- between 5th and 6th, 1;
- between 6th and 7th, 29/32;
- between 7th and 8th, 7/8;
- between 8th and 9th, 13/16;
- between 9th and 10th, 3/4;
- between 10th and 11th, 23/32;
- between 11th and 12th, 21/32;
- between 12th and 13th, 5/8;
- between 13th and 14th, 19/32;
- between 14th and 15th, 9/16;
- between 15th and 16th, 1/2 inch.
The position dots are placed between the 4th and 5th, between the 6th and 7th, between the 8th and 9th, and between the 11th and 12th frets. At o a little hole, 1/8 of an inch in diameter and about 1/8 of an inch deep, must be drilled in the finger board to receive a short peg of hard wood with a small notch in the upper end for the short string to pass over. This peg must be firmly-glued in the hole so that it will not come out. It should project above the surface about 1/8 of an inch. To mark the frets use indelible ink or oil paint. Use a color that will show plainly on the stained wood.
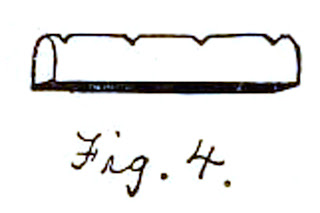
In marking the frets you must be very accurate about the distances between them; if you do not get them right the banjo will not be true. Having the frets all marked, take a piece of maple or other hard wood 1 3/8 inches long, 3/16 inches wide, and 1/4 inch deep. This must be glued firmly to the neck at the upper part of the finger board at A for the strings to pass over. Cut four small notches in it.
Fig. 4 shows it.
This finishes the neck.


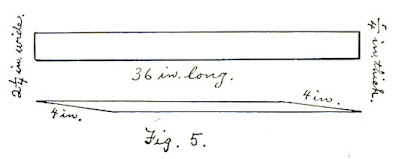
Having done this, draw a circle 10 inches in diameter on a piece of paper. If you can get the strip steamed in a steam box so much the better, else you must bend it by heat. Take a medium sized goffering iron and place the heater in the fire till it is of a dull red color. Then replace the heater upon the standard. Hold the strip of
maple on the iron, keeping the upper side of the wood wet with cold water. Keep the wood in motion so that it will not be scorched too much. Occasionally hold the hoop to the circle marked on the paper to see if it has the required curve. When you have it bent to the required form glue the overlapping ends together and clamp them there tightly, and let it dry for about twenty-four hours.
Now go to a dealer in musical instruments and buy a calfskin head to put over the hoop. Get one of 12 inches, which a better plan is to get a strip of brass 34 1/4 inches long, 1/2 inch wide, and 1/16 of an inch in thickness; 3/8 of an inch from each end drill a hole through it and then bend the strip in a perfectly round circle, or, rather, as nearly perfect as possible; put a brass rivet through the holes, and rivet the ends firmly together. Take a file and file the ends down, as shown in Fig. 7.

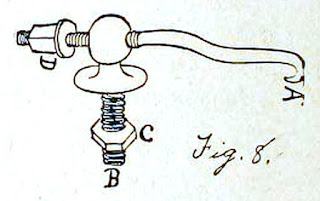
Get about six, eight, or ten banjo brackets, which are used to keep the calfskin head stretched tightly over the hoop. Put the calfskin head on the hoop, and over the skin put the brass rim. Fig. 8 shows one of the brackets.
Hook the hook A over the brass rim, then, at the right distance, drill a hole through the hoop large enough for the screw B to go through, when it can be fastened on the inside of the hoop by the nut C. Put the brackets at equal distances apart. The skin can be tightened by turning up the nut D with a small wrench or a pair of pliers.
Now go to work, and 3/8 of an inch from the upper edge of the hoop cut a hole 1 inch square for the strip G, Fig. 1, to go through. Do not cut it too large, but just large enough. At the opposite side of the hoop, where the end of the strip G comes, drill a hole through the hoop and into the end of the strip G, making the hole 3/8 of an inch in diameter and about 1 inch deep to receive the end pin, Fig. 9.

Glue the end pin firmly in this hole so that it is not liable to be pulled out.
Fig. 10 gives a back view of the banjo, showing the strip G running through the hoop.

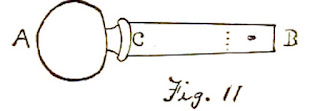
For the pegs take a piece of maple about 1/2 an inch thick and cut out four like Fig. 11, making the dimensions as follows:
From B to C is 1 1/2 inches;
from C to A is 1 inch;
at B it is 1/4 of an inch in diameter;
at C it is 3/8 of an inch in diameter.

Make them as neatly as possible, so that they will fit accurately in the holes. Drill a hole about of an inch in diameter through the pegs 1/4 of an inch from the end B, for the strings to pass through. For the side peg make one a 1/2 inch shorter, as shown by the dotted line, and the hole for the string must be drilled about 1/4 of an inch from C. The bridge, Fig. 12, should be made of maple 1/4 of an inch in thickness.

From A to B is 2 inches. It is 5/8 of an inch high, and should be
thinned down from 1/4 of an inch at the bottom to about 1/8 of an inch at the top.
Cut five small notches in the top for the strings to pass through. Next cut the tailpiece, Fig. 13, from a piece of maple, making it 1 1/2 inches wide from A to B, and 1 3/4 inches long from C to D.

It should be about 3/16 of an inch in thickness. Half an inch from the top drill five holes about 1/16 of an inch in diameter, for fastening the strings in. At the bottom drill two holes, so that it can be fastened to the end pin by means of a piece of catgut or string.

This finishes the banjo, with the exception of the strings, which can now be put on. The bridge should be placed about two inches from the tailpiece. Smooth down any rough or uneven edges or surfaces. If you have a banjo to look at while working it will be a great help, though not absolutely necessary, as by paying close attention to the diagrams and the instructions you can get along very well. Do not be in a hurry, and do everything as well as you possibly can, and I think you will not be disappointed.


